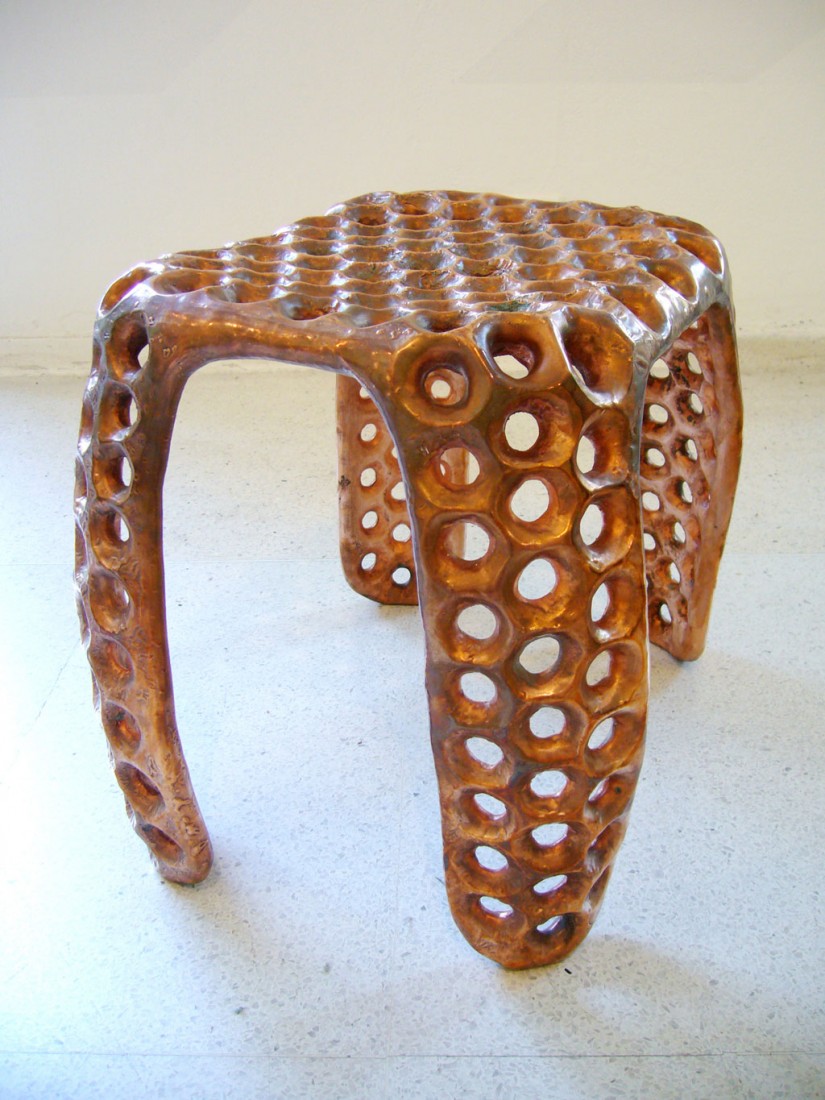
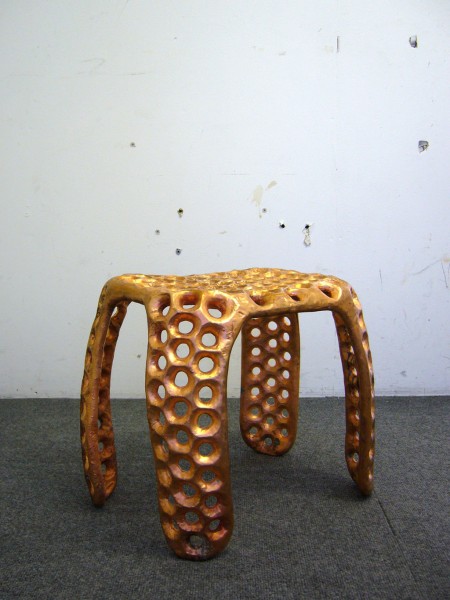

 029 – Copper Stool
Copper Stool
2006
Copper
450 x 340 x 400
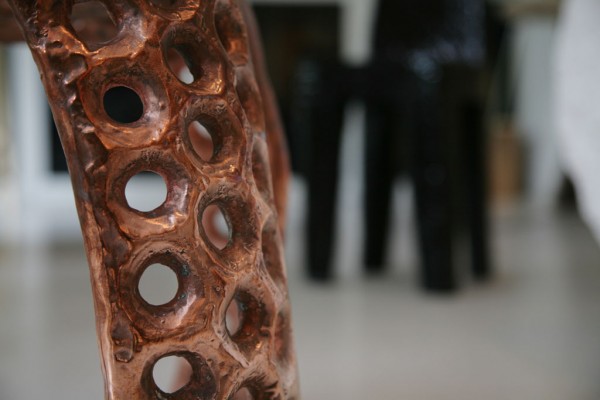
Process: Metal can be grown onto almostany substrate using a sophisticated electro-deposition process similar to electro-plating. This deposits nanocrystals of metal in an even honeycomb pattern thus ensuring there is no stress built into the metal and allowing the manufacture of organic metal shapes in one continuous piece. Nanocrystalline metal is the strongest, most flexible form of metal achievable as the metallic structure is microscopic and entirely uniform. The virgin copper has no previous memory. Each copper particle is between 35-45 nanometers in size, approximately the size of 6 carbon atoms. Complete encapsulation of parts is possible with a metal coating as thin as 50 microns and as thick as time allows, and is an environmentally clean room temperature process that will not destroy the substrate onto which it is grown. This ensures metal parts are perfectly formed to the original object with no additional machining required. The unique nanocrystalline structure makes the metal stronger in the curve than the flat, while remaining ductile at temperatures down to liquid nitrogen. The object to be encapsulated in metal is carefully sprayed with a fine suspension of colloidal silver in alcohol. The silver solution makes the object conductive and thus will attract metal particles when electrically charged. The silver coated object is then dipped in the electro-deposition tank containing an aqueous solution of 15% copper, 80grams per litre of copper sulphate and both organic and inorganic additions that refine the grain structure of the copper. The time spent in the copper solution dictates the thickness of copper deposited on the surface of the object.
My initial intention for utilising the electro-deposition process was to produce a piece of seating in expanded polystyrene – to literally hand carve either a stool or a chair from a block of material and then electro-deposit copper onto the rough bobbly surface. The idea being that once encapsulated in copper, the polystyrene core could either be melted or dissolved to leave a hollow metal form. The seat would be extremely strong, very lightweight, and have an amazing textured surface that makes reference to the nanocrystalline structure of the copper itself. I worked closely with Ross Morgan of Morganic Metal Ltd. and we did an early experiment of electro-deposition on a miniature chair I carved in expanded polystyrene. The test revealed two main problems. The silver solution that is sprayed onto the object to make it conductive has an alcohol base that easily corrodes styrene, causing the delicate bead of the polystyrene to become pitted. This could be controlled using a very dry mix of the silver solution. The second problem, however, was less solvable. Polystyrene is extremely light and buoyant, and in order to grow copper over the surface of the object it must be submerged in the electro-deposition tank. The small test chair was easy to handle but a full sized chair in polystyrene would require a complex frame to give enough rigidity during submersion, and the current of the copper solution being pumped around the tank would cause too much movement of the polystyrene. The result would be a weak nanocrystalline structure and a copper chair without the incredible material strength normally achievable with electro-deposition.
It is necessary to use a material that displays sufficient rigidity to support its own weight, is non-buoyant or at least easily submerged, has a surface that readily accepts the conductive silver spray, and for my purpose, easily mouldable by hand using simple tools. Having played with the idea of using polystyrene due to its intriguing texture and potential to create hollow copper forms, I became fascinated by the possibility of producing a chair using a material that could be melted away once it had been encapsulated in copper. After much research I discovered a type of modelling wax produced by British Wax that is very hard and rigid at room temperature, yet at temperatures above 40º-50ºC becomes easily manipulable by hand. Best of all, the wax can be melted from the copper shell once electro-deposited and reused to model new pieces of furniture. As a raw material, it is infinitely renewable.
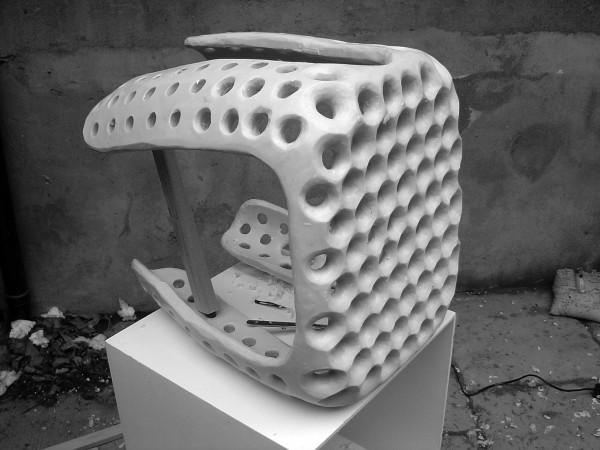
I began modelling the wax using my bath filled with hot water to make the wax mouldable. The hot water conserved the heat of the wax and made it easy to manipulate for long periods of time. I performed many different experiments using the wax, playing both with form and surface texture, all the time bearing in mind the process of electro-deposition and the strength characteristics of the nanocrystalline copper. My first full sized chair was a hand-made replica, from memory, of Gio Ponti’s Superleggera chair of 1957. I chose this chair due to its structural integrity and amazing lightness. My wax Superleggera had a very uneven surface, and almost childlike appearance. The chair was incredibly difficult to construct due to the size of my bath. I had to build the chair in seven sections and then combine them together out of the bath when the wax was cold. The wax has no inherent structure when warm and yet can not be moulded together when cold. To create four legs, two backrest uprights and a seat surface in soft wax is impossible unless cold and rigid. So to join each section I had to heat the joint area locally using a hairdryer. This involved supporting all the relevant sections in position whilst heating the two pieces to be joined until they could be squeezed and moulded into one. Although I liked the handmade, naïve character of the chair I encountered structural problems with the design. The delicacy of the legs and uprights of the backrest could not support the weight of the heavy wax, and very gradually the chair began to slump. This could be disastrous when in the electro-deposition tank and thus I had to rethink my design.
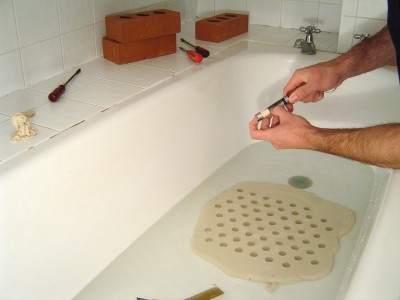
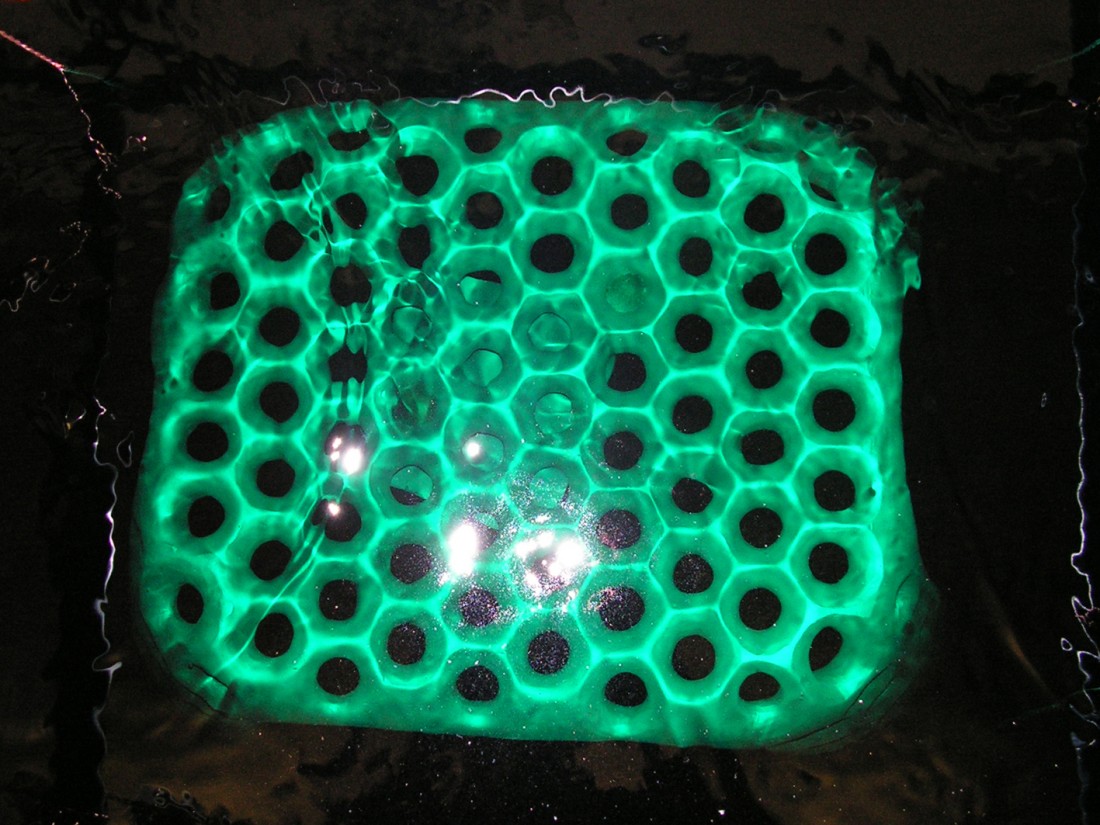
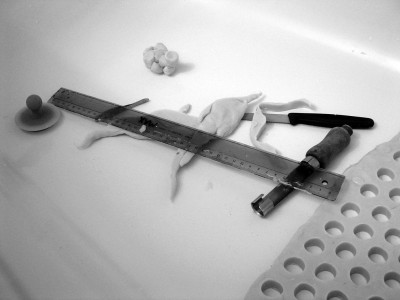
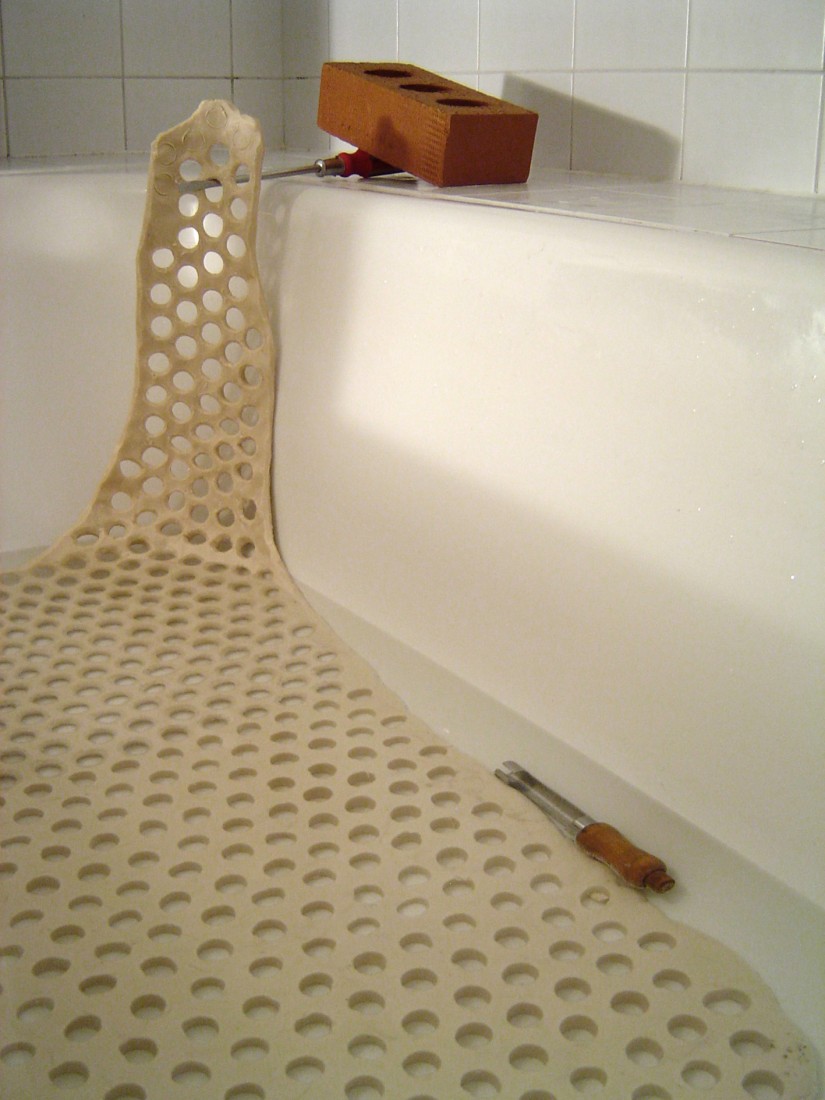
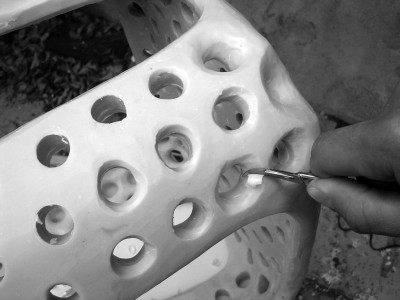
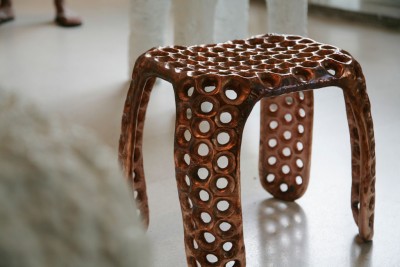
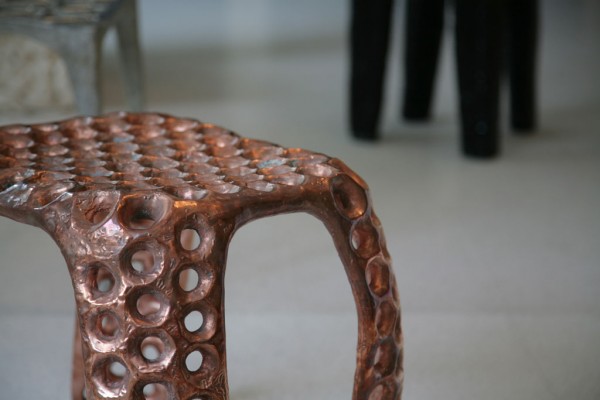
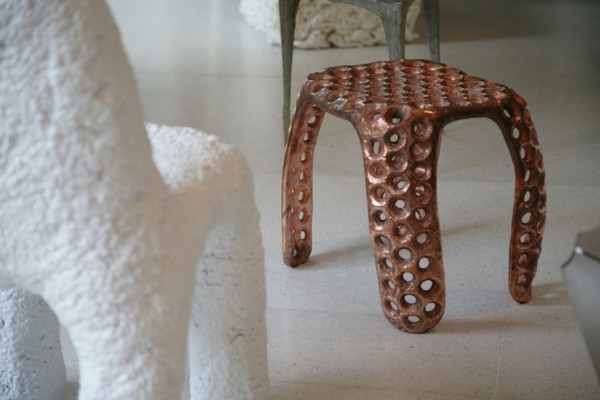
I decided a chair without the added weight of a backrest was a sensible option to pursue, especially when the cost of the process was taken into consideration. I proceeded to make a four-legged stool in thick sheets of wax, with a pattern of holes for visual lightness and to give the copper shell additional rigidity. I rolled out a flat sheet of wax in the bottom of the bath with a rolling pin, approximately 15mm thick. I used an old apple corer recently purchased from a car-boot sale to cut regularly spaced holes into the wax. The holes were arranged in a triangular pattern, similar to the way spheres pack together most efficiently, and I continued the holey pattern over the whole surface. Using the tap end of the bath as a mould I pressed two similarly patterned lengths of wax into two corners of the flat sheet so that two legs were created, each sticking up out of the bath using the corner radius as a form. Once moulded together and the overlapped holes neatened, I rotated the flat sheet and two legs 180º and repeated the process with a further two legs15. I now had an upside down, oblong stool with four gently curving legs, entirely covered in a pattern of circular holes. I emptied the hot water and ran cold water over the stool to make the wax rigid. I carefully removed the whole structure from the bath and slumped it over a box whilst I carved a chamfer around all of the holes both top and bottom. I did this by rotating a scalpel around the edge of each hole three or four times to create a rough radius16. With over 400 holes this was a very time consuming process. I then returned the stool to a medium hot bath to make the radius on each hole as smooth as possible using my finger.
At this stage I realised that a smooth surface could only be achieved on the underside of the stool as when in hot water it can not support its own weight when upright. To smooth the top surface the whole stool would have to be submerged in hot water and thus the stool would collapse. Unfortunately I learnt this the hard way. Upon near completion of my labouriously carved wax stool, and just one hour prior to delivering it to Morganic Metal for copper encapsulation, the structure melted when I placed it in water that was slightly too hot. My stool was irretrievably slumped at the bottom of my bath.
Three hours of sleep and a cup of tea later I began the stool again. This time I improved both the design and the process. The wax became 20mm thick, the legs wider and the holes fewer. I performed most of the moulding in my bath and once I had a seat surface and legs I moved to the kitchen sink. This is smaller than the bath, enabling all four corners of the sink to be used simultaneously, one for each leg. The radius around the edges of the basin are smaller, more proportionate to the scale of the stool, and also help to create stronger legs. I placed the flat seat surface into the bottom of the sink with the edges wrapping slightly up the sides and then joined each leg to one of the corners, blending the wax as well as possible until seamless. I used the apple corer re-cut the holes that had filled in whilst attaching the legs, then topped up the sink with cold water to harden the wax. To remove the stool from the sink I had to slide a scalpel blade and ruler between the wax and the side of the sink, as the hot water had firmly stuck the two together. Once out and dry I had to cut away the impression of the plug-hole that had formed on the surface of the seat, and the process of carving the radius on all of the holes began again. This time I used a variety of scalpel blades to make the job easier and neater. Instead of submerging the stool in hot water to smooth the surface of the wax, as with my tragic first attempt, I used a hot air gun with a fine nozzle and a blowtorch to gently brush the wax with very hot air. All the ridges, bumps and imperfections melted and blended together to form a very smooth wax surface. A few air bubbles had to be broken and filled with wax before the stool was delivered to Morganic Metal for electro-deposition.
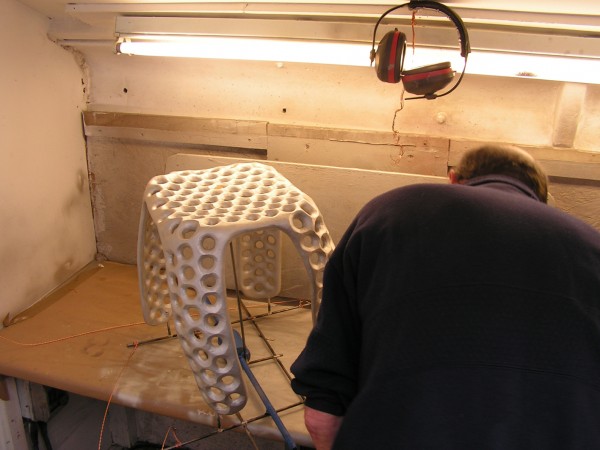
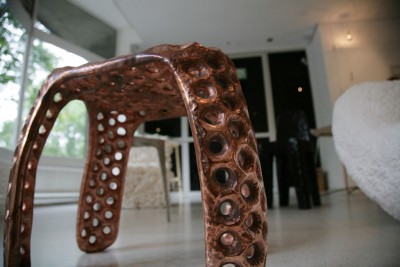
A custom metal frame was built to accommodate my wax stool with two supports attached to the underside of the seat and a metal rod inserted into the bottom of each leg. Once wired up with the necessary electrodes and securely fastened, the entire stool was sprayed with special silver solution. The frame was then hooked onto the bar suspended above the electro-deposition tank and the whole unit submerged. The copper began to cling to the surface of the stool and grew in thickness very slowly, nanocrystal by nanocrystal. Due to the current that forms as the copper solution is pumped around the tank, certain areas of the stool received a more prominent flow of copper than others. This causes the copper to develop in thickness quicker on the high profile areas than on surfaces concealed from the flow. The design of my stool was such that the areas that attracted a thicker layer of copper were also the areas of the stool where extra strength is required when sat on. The feet, the outer face of the legs, the shoulders of each leg and the top surface of the seat are all areas that are subjected to higher levels of stress when the stool is sat upon. Thus the natural tendency of electro-deposition only benefitted the performance of my stool, building approximately 900 microns of copper where it needs extra strength, and only 500 microns where less stress is exerted. The electro-deposition process created a superbly strong, questionably light and surprisingly hollow copper stool. The holes decorating the entire stool provided thin supporting walls of copper between the inner and outer faces of the stool.
Once sufficient deposition of nanocrystalline copper had occurred the stool was removed from the tank. The supporting frame was cut away and the four holes in the underside of the legs were exposed. Gentle heat was applied to the base of the legs and the wax began to melt out, until all but a thin residue of wax lining the inner walls of the stool was extracted. This residue, in theory, was easily removable by submersing the stool in a tank of aqueous detergent for ultrasonic cleaning. In practice, this penultimate process proved catastrophic. Electrical faults are impossible to predict, and unfortunately my work was the recipient of a rather serious one. A time switch controlling the length of time the tank was to run for had evidently seen better days, and in the middle of Friday night an electrical fire started directly above the cleaning tank containing my stool. The polypropylene tank and adjacent timber staircase began to burn. The tank collapsed spilling the aqueous detergent, and my almost completed stool was released into the fire35. At temperatures above 370ºC copper anneals making it very soft and pliable. My copper stool was heated to approximately 500ºC, causing the copper to distort, wrinkle and blister. Worse still, the nanocrystalline structure of the metal that had grown over 60 hours of electro-deposition agglomerated, becoming soft, ductile and malleable. The heat had irretrievably consumed all the nanocrystalline strength. Once again my stool of labour was ruined.
Two options lay before me; start building a third wax stool, or attempt to salvage the burnt remains of my annealed copper stool. With time against me the second seemed the only realistic route to take. The stool was sandblasted to remove the burnt plastic and regain a bare copper surface that would accept a new layer of electro-deposited copper. A further 300 microns of copper was grown to ‘case-harden’ the stool and achieve its original strength. The resultant stool has a highly irregular texture across the seat surface and two very blistered legs. I made the measured decision not to tamper with these unintended details, firstly due to the time required to remove them, secondly because they give the stool a character I could never have contrived, and thirdly because they occurred naturally, and concealing them would hide the inherent transparency of process so important to my work. My Copper stool is as it was meant to be.